While in last week’s Photography II class — taught by New York City’s PhotoUno Photography School — we learned about how our cameras are calibrated to set the exposure meter to 13% gray, this week we’ll be taking things a step further and looking at metering modes to manipulate the way a photo is exposed as well as how to use lighting to change a scene’s mood, use your creative storytelling skills, and tell a different narrative.
Metering Modes
Patricia, our expert photography teacher, explains that all cameras work with three different metering modes — although Canon’s have four — including Spot Metering, Center Metering, and Matrix/Evaluative Metering. Each one is used in different situations and using different methods. Metering Modes can help us exposure in an easier and more predictable way.
First we look at Spot Metering, typically used when the background of the scene is much darker or brighter than the subject as well as during tricky lighting situations. While each camera differs slightly with how you go about using Spot Metering, for Nikon you’ll be able to set a focus point — one of the small dots visible in the bottom corner when you look through the viewfinder — and tell the camera where to measure exposure 100%.
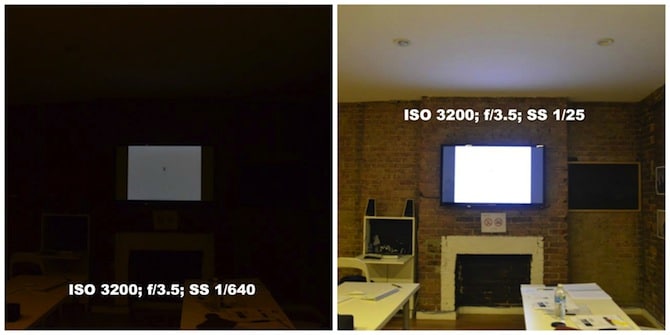
To help us better understand this concept, Patricia instructs the class to stand at the back of the room facing both a lit television monitor and a blackboard. First we set the focus point on the monitor, with the camera telling me the photo is overexposed and having me make the shutter speed faster to darken the scene. In the end, the photo comes out extremely underexposed aside for the monitor, which is overexposed.
Without moving my camera, I shift the focus point to the blackboard. This time, the exposure indicator instructs me to slow down my shutter speed in order to brighten the scene. Because the blackboard is extremely dark, however, it assumes the entire room is too, overexposing the shot. Despite both times the same exact scene is in the viewfinder, the exposure indicator shows two totally different sets of exposure values — literally zipping from the positive to the negative side of the exposure indicator — depending on where I set my focus point.
The next metering mode we look at is Center Metering, which focuses about 60-70% on the center of the scene, also taking 30-40% of the rest of the shot into consideration. Patricia tells us how she likes this mode for portraits using natural light as it makes sure the subject is correctly exposed without having the background affect the lighting too much. She also suggests using Center Metering when doing focus recompose — a concept I discussed in the last installment of Behind The Lens. According to Patricia, when we use this focus recompose, we’re typically using the focus point in the middle — which is where Center Metering takes the most into consideration — as it is the one that focuses faster.
Finally, we discuss Matrix/Evaluative Metering, which takes the entire scene into consideration when suggesting an exposure. This is a smart choice when taking photos of evenly-lit scenes, as you won’t need to compensate for uneven lighting or choose what type of lighting you want to focus on. This is often the standard metering mode on a camera. If you’re the type of photographer who uses flash, this is the metering mode you should use as it is the mode the camera naturally sets flash in.
Considering Lighting
Discussing metering gets us into our next topic: lighting. Lighting is important when taking a photograph as it sets up a mood, can add texture, draws attention to certain elements of the scene and helps tell a story. What amazed me most was how many different types of lighting there were. While I’d always thought of lighting as either natural or artificial, there are actually a variety of ways you can position your light source, your subject or yourself for different outcomes.
While there are more that exist, the types of lighting Patricia demonstrated for us both through photos and with a live model — and then of course with an interactive exercise — include Front Light, Under Light, Side Light, High Side Light, Top Light and Back Light. With each she changed the position from which the light was coming from for a different effect. These names are pretty self-explanatory, but to help you understand the outcome of the photo they each have nicknames, as well.
For example, Under Light is also known as Monster Light — think of your childhood camp counselor putting a flashlight under his chin during campfire ghost story time — and offers a spooky effect. High Side Light creates an elegant triangle of light near the eye on the side of the light source, with both eyes illuminated and one side of the face shadowed. Dutch painter Rembrandt Harmenszoon van Rijn used this type of lighting to dignify his subjects. Another name for Top Light is Butterfly Light, as the light bulb creates a shadow under the nose that looks like a butterfly, while Back Light can be called Edge or Rim Light due to the creation of lit edges rimming the subject and the separation of it/them from the background, revealing form. Front Light is also known as Beauty or Glamour Shot because it’s so direct it tends to minimize wrinkles and other imperfections, although Patricia claims it makes her “not look so good.”
Which gets us to our next point: not all lighting situations look the same on all subjects. While one person may look great with Butterfly Light, someone with a longer nose might get more of a “Charlie Chaplin Mustache” look. It all depends on the features of your subject and the mood you’re going for. You can also mix types of lighting for different effects or to fill shadows, like Back and Side Light or Butterfly and Monster Light. Keep in mind, though, that this isn’t the only way to fill shadows (but we’ll get more into that later).
Hard vs Soft Lighting
Before we’re sent off to practice these lighting situations on our own, we talk about the differences between hard and soft lighting, as there are some general misconceptions. For instance, many people think hard light is bad for portraits; however, Patricia shows us a stunning photo of Joan Crawford that tells otherwise. This type of lighting come from a single concentrated light source, shining right onto the subject without being deflected anywhere else.
While it’s true this type of lighting won’t work for every situation, when you’re looking to capture a high contrast image with sharp shadow lines that highlight features of your subject it can help create very interesting images. On the other hand, soft lighting exchanges these hard-edged shadows for soft-edged shadows. If you have trouble telling the difference between these two types of lighting, look at the shadows. That’s where your answer lies.
At this point, Patricia provides a tip we all find very innovative: to soften light, wrap a receipt around your flash. Really anything translucent that can diffuse light but still have it shine through can work. This goes for both on your flash or the scene itself..
There also natural light to consider, which Patricia advises can make for exceptional portraits when streaming in from above. Like when we went over lighting types and were using artificial lamps indoors, one should also consider the sun’s position and how it will shadow your subject’s individual face.
Bringing Lighting Concepts To Life
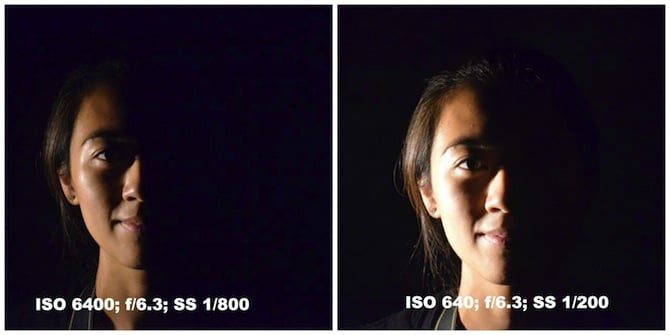
In order to practice the different lighting patterns we break into groups of four, rotating different positions: one person being the model/subject, one holding the Swedish illumination device (light source), one being the photographer and the other holding a black cardboard behind the subject for a nice solid background that eliminates distractions. The photographer is instructed to choose three lighting situations and try to photograph the model using them. On my turn to be the photographer I choose Front Light, Side Light and Back Light. As all the lights in the room — aside for the Swedish illumination device — are turned off, I turn my ISO to 6400 to compensate for the extreme darkness of the scene.
Now we’re really incorporating all of the lessons we’ve been learning. I set my custom white balance — a lesson from last week’s Photography II course — by placing a card with 13% gray on the chair where the light will be shining on the subject and taking a shot of it in my custom white balance savings and saving it. Next, I set my shutter speed to 1/400 — for the first photo anyway — making sure to be at least twice as long as my focal length to reduce camera shake and freeze the shot. Then, I compensate my aperture.
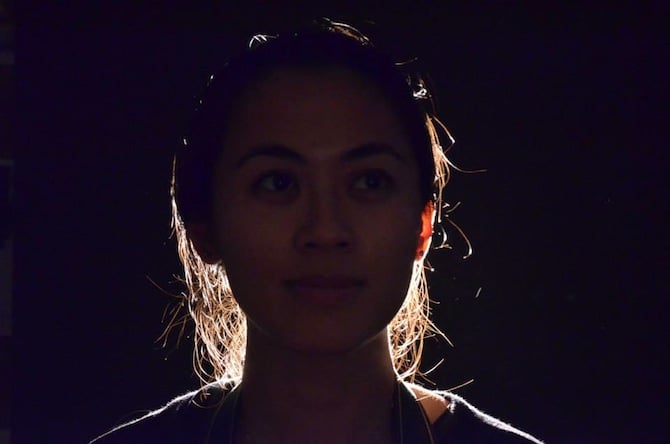
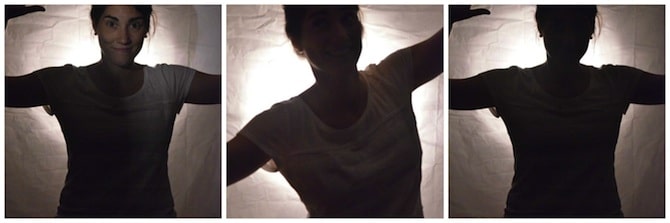
It is most interesting to see how the lighting works on the different models, as each one of us has different outcomes with our portraits. For me as the photographer, the trickiest but most rewarding shot was taking one of my model with Back Lighting. I made sure the light bulb itself couldn’t be seen, but just the illumination creating sharp shadow lines around her. Using Spot Metering, setting the focus point on her made the shot overexposed; however, focusing on a small stream of light coming through her hair made a perfect silhouette.
According to Patricia there are certain times of day that are the magic hours to shoot using natural light: sunrise and sunset. We also discuss the proper way to photograph someone standing in front of a window. In my homework for class dealing with setting custom white balance I had photographed my subject in front of a window during the day, with me facing the window. A better approach that would have allowed for a less overexposed photo would have been to change my position and stand in between my subject and the window so the light was still hitting, but the outdoor light wasn’t hitting him full on.
When shooting a subject in front of an open window you also need to be careful what you expose for (hint: this tricky lighting situation is a great time to use Spot Metering). Turn off the indoor lights so you’re not mixing different types of illumination and make use of the natural light coming in the window. If you expose for the shadows the camera will think the scene is all dark and will try to compensate by allowing more light in — typically leading to an overexposed photo; however, if you expose for the highlights you can get a nice silhouette as the camera thinks the entire camera is bright and will try to darken the scene.
Modifying Light
We practice this silhouette exercise with Patricia as our model. For this we get into modifying light, which can be done in a number of ways. If you want to fill in shadows try using a silver reflector (which also adds contrast) or a white reflector on the opposite side of the light source. You can also hold a white cardboard below your subject’s face (this is obviously where having an assistant comes in handy).
Interestingly, we try out these tactics with Patricia standing in front of a white shower curtain, which is acting as a diffuser for the two Swedish illumination devices behind it. You can really use anything with some translucence to do this, and the effect is a softer lit photo. This works because the larger the source of light is, the softer the photo. So, when you place a diffuser between your subject and a small, concentrated light source you illuminate the diffuser, allowing that to now be what lights the scene.
As you can probably tell above I had a little trouble with this exercise, although I think it was my position low to the ground and under the light that was hurting me. What allowed my photo to get better toward the end was another lesson we had learned last week: fine tuning of my exposure. As Patricia was coming out too bright when I set my exposure indicator to neutral, I exposed for the highlights and fine-tuned to underexpose the photo and make Patricia look darker against the light source.
I leave class, as usual, with a head packed with new information. My mission for the week: to find a model who will let me photograph them using the above-discussed lighting techniques to present in class next week.
If you want to learn more about telling powerful stories through photography, check out these amazing photography tips.
This article has been part of an Epicure & Culture original series, Behind The Lens.
Do you have a tip to add or a question concerning lighting and photography? Please share in the comments below.
Also Check Out:
Conquer Your Bucket List, Now!
#InstaTravel: Food, Culture And Beautiful Views In Guatemala